Export and Import Data for data backup and data restore from RTC Client
NAV has feature of exporting and importing data from client window which is useful when we have to create copy of latest company with the data in different computer or to export data from on computer and then restoring it to another computer. The process to create and restore companies in different system are called Export to a Data File and Import from a Data File respectively.
What is Data Backup and Data Restoration?
The process of taking data backup from RTC Client in Microsoft Dynamics NAV is commonly known as data export in .navdata format and data restoring or company restoring from RTC in Microsoft Dynamics NAV is known as data import from .navdata format file.
These tasks are located in the IT Administration menu (Departments > Administration > IT Administration > General) or it can directly access from the search bar by typing “export data” and “import data” and selecting the related link.
First Thing First:
Before exporting and importing data it is essential to have permission for data backup and restore. Also the database where we are importing data should be compatible with the .navdata file which we have exported. Must export all dependent data which a company required to execute like permission sets, user ID, common company data etc. so after importing the data the imported company could execute similar as original system.
Following is the step by step guide to export data that is to take data backup in NAV:
Export Data in Nav (.navdata file)
Q. How to export data in NAV?
A. Follow the following step by step process to export data or to take only data backup in nav.
- Type “Export Data” in search box and choose related link or go to Departments > Administration > IT Administration > General and select “Export to the data file”.
- After selection following windows will be displayed
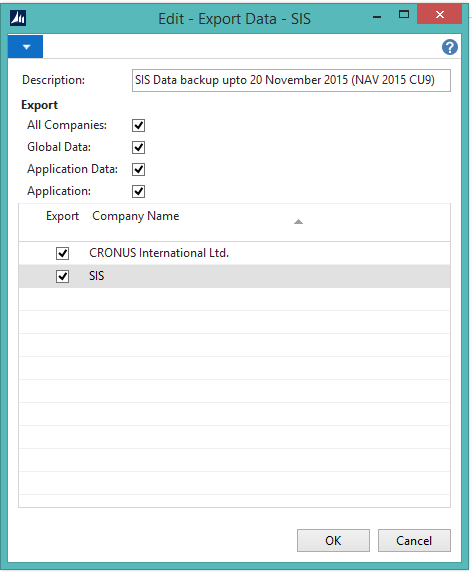
Export data in NAV - Choose the fields as required.
Description: (Optional) Specify a description that makes sense for the exported data so it will be helpful while importing the data. The specified description will be displayed as suggested name when choosing the location to export.
All Companies: Check this field to export all companies from the database else select the database from the lines below.
Global: Check in this option will also copy/export all data common to all companies in database. This will includes:
> Report list
> Permission sets
> User IDs
> Printer selection
Selection on this filed will not export company-specific business data.
Application Data: Check in this option will export the application data that defines the application in the database. The following data will be exported
> Permission
> Permission sets
> Profiles
> Style sheets
Importing the application data to another database will overwrite the application data in that database.
Application: Check in this field will export all objects. This process is similar to creating fob.
(Note: if the database is not compatible to the exported file check on this field may replace the objects too.)
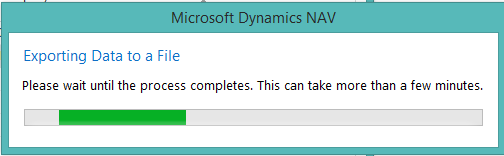
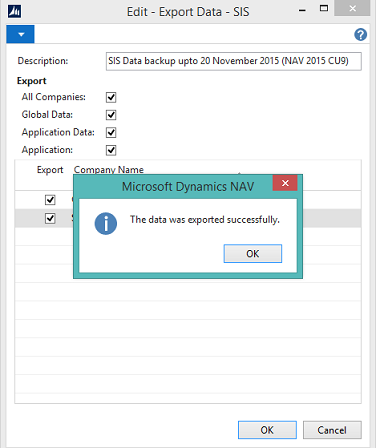
- After completing these parameters select the ok button on the bottom left corner of the displayed window which will promote to choose location to export .navdata file. Select the location then click save.
It will take some time depending on the size of database wait until the process is completed.
Following is the step by step guide to import data that is to restore data backup or to restore companies with data in NAV:
Import Data in Nav (.navdata file)
Q. How to import data in NAV?
A. Follow the following step by step process to import data or to restore data backup or to restore companies with data in nav.
- Type “Import Data” in search box and choose related link or go to Departments > Administration > IT Administration > General and select “Import from a data file”.
- After selection following windows will be displayed
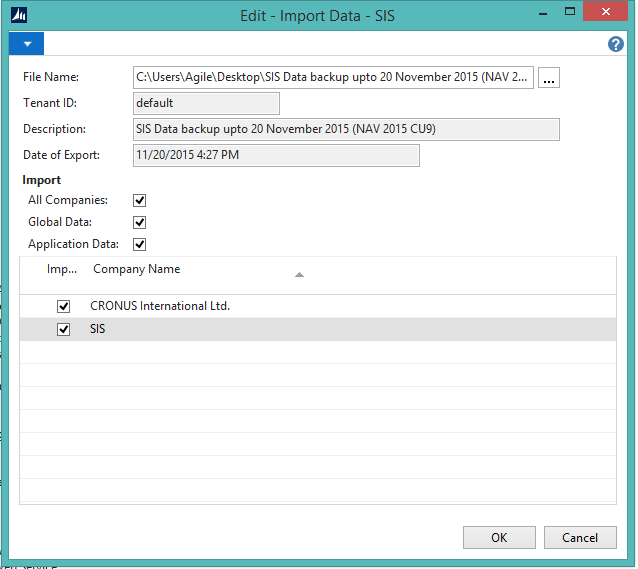
- Choose the fields as required.
File Name: select the .navdata file (which was export by data backup process as discussed above) from location where it was savedTenant ID: default (display at the beginning if the different tenant are present should select the one)Description: Description of .navdata file (Description is information that was specifies during the export of .navdata file)Date of Export: Data exported data.Both Description and Date of Export will automatically displayed when the file is selected.
Import:
All Companies: If all companies is need to be imported then check all companies else check only required companies from the lines below.
Global data: If global data are required to be imported form the .navdata file then check this else uncheck so the imported data use the global data of system
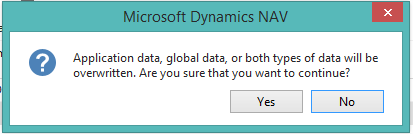
Application data: Check if application data is need to be imported.Following confirmation will be displayed before exporting the data
- Click OK from the bottom right corner to import and restore the data and wait till the data is imported. It may take more time if the size of data is large.

Reference:
Data Export and Import in NAV
Data Export and Companies restoration in NAV
